Monday, February 20, 2012

All Aboard!

 After purchasing the new mattress for the girls bed, we had some long cardboard boxes to recycle. Before they went out, we decided the boxes (well, just one box) could be used for playtime. I drew a train along the box and let the girls have at it with the crayons. That happily took almost 45 minutes! Thea ended up spending time stacking crayons other then coloring, but, hey! She was busy!

 Some of their animals and dolls go for a ride:


Thea is the engineer. Mostly she likes to say "Choo-choo!"
Ella is the conductor, she kept yelling "All-aboard!"
They played train for a long time today - I was in heaven!

Sunday, February 19, 2012

Ella's first school valentines

With Ella in preschool now, she had her first Valentine's Day card exchange. Here are the cards that she made:


I got the idea off of pinterest and with a little alterations we came up with our own version. Ella colored all over the red paper, then I cut them into hearts. I printed out hearts that said "You make my heart GLOW" and cut them out. Ella then embellished them with glitter and signed her name. After the glitter dried, she taped the smaller heart to the larger one and then taped 3 glowstick bracelets to the back. She was pretty excited about using glitter and getting her own glowstick bracelets. :)

Ballerina Mobile

 Trying to not use Pinterest as a project hoarding place, and actually make some of the things I pin, I made this ballerina mobile for the girls room. Ella told me that she wanted "Ballerina's, Princesses and Mermaids in my fancy room." Okay, I can do my best and accommodate that. :)

The idea is found here. I went to the blog and it's not in English, so I will tell you step by step how I did it.

First I saved her images. Then I opened them in publisher and increased them to the size I liked. After printing them, I traced around the image with a pencil, flipped it over, placing it on cardstock and traced the image again (this transfers the pencil on the other side onto the cardstock). Using sharp scissors, I cut the ballerina's out.

Since our ceiling is white, I wanted the snowflake tutu's to be in color. I used scrapbook paper scraps and cut out 3 snowflakes, using the six sided snowflake method.

I tied a strand of thread around their wrists and then just taped them to the ceiling at alternating lengths.


Ella laid in bed the first night and just giggled at watching them twirl in the breeze from the ceiling fan. The best possible outcome from this project!

*The tape is only visible thanks to my flash.

Big girl(s) bed

 Ella has one of those Convertible Cribs. She used it as a toddler bed for a long time, and now it was time to upgrade to the full size. Our plan is for the the girls to share a room, so while a full size bed might seem like much for a 3 year old, its just right for a 3 year old and a 16 month old. Thea has been sleeping with us since she was born, so I have no concerns about her sleeping in a big bed. I did want to keep the bed low to the ground though, easier for Thea to climb in, and less of a fall if she does fall out.

So the plan was to use the slats from Ikea in lieu of a boxspring. The one problem is that our bed doesn't have a center rail to rest the slats on. I asked them at Ikea about it, and the guy said that it wouldn't be a problem, that the slats attach. Um, no, they don't. Off to Home Depot to see how I can make this work.

I pre-measured the bed before I left, specifically the length of the bed and the height of the side cleats from the floor (77" and 8" respectively).

I ended up with a 2x8 and six 8x8 steel brackets. They cut the 2x8 to just inside the mark of 77" (my request, just to make sure it fits inside the bed and not scratch it) for me, and after grabbing some 1 1/4" wood screws, home we went.

When I first stood the 2x8 in the center, I checked it against the cleats - perfectly flush. Unfortunately the brackets stood above the 2x8 by a 1/4". I had a moment of "AAAH!", and then I placed the slats on top to see, and low and behold, the slats are 1/4" thick, so the brackets become flush. Yay!

So I preceded to screw the brackets on, lining them up with the slats laying down in the picture. With the brackets, the 2x8 is free standing (and strong!) and I didn't have to attach anything to the bed (which keeps it functional as a crib or toddler bed if need be down the line).

Here is is with the slats on. It works! Phew!

And their bed all read to go!*


*Bed is Rockland, Cottage Bed, JC Penny's. Sheets are Ladybugs from Target. Quilt is made by my Grandma.

Mudroom Work in Progress

 This is a stock picture of the changing table/dresser I had in Ella's room. It didn't survive the move across the country very well and when I picked up a new dresser from freecycle, I started taking this one apart to salvage screws, etc before tossing it.


 Ella wanted to help so, after I took the bottom off, I turned it upside down and let her have at it with the screwdriver. I stepped away and noticed this...

 It looks just like a bench! And that had me curious. I already had stripped the doors off an unused closet next to the garage door and painted it (bright!) green. I was going to put a chair in there, but I wondered if the bench would work? I took measurements, and it was a perfect fit! It wasn't a perfect install though. I had to take it apart and reassemble it in the closet.

So now I have the old dresser being used as a bench/shoe cubby in our new mudroom closet. The hall is tight, so it is really hard to get a good picture. I need to make a cushion still, and I might frame it in with molding. I am still unsure about that part though.

I love it when something can be used in a new way!

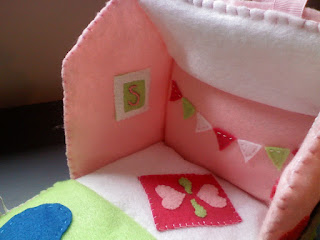
Another Fabric house

I love UK Lass's little fabric house. I especially love browsing her flickr group and seeing all the wonderful houses others have made. There is one that is made of felt and everything about it makes me happy. So, when I got a 4 year old girl in our Secret Santa exchange, I knew exactly what I was going to make her. This is inspired greatly by Jenn White's felt house in the UK Lass's flickr group.


The little girl received the Calico Critters Buttercup Kitten Twins to go in this little nursery. Here I used our Calico Critters Elwood Elephant Twins just to give you an idea of scale.

I loved this construction process so much more then the other houses. This time I pre-embellished all the house parts, and then assembled. The blanket stitch assembly was a little tricky, but would be easier to do the next time I go around, now that I have done it once.

Ultimately, I think I just really like embroidery. It is very satisfying to me to hold something dainty in my hands and make something that looks so charming.

I can't decide what part I like the best, the stone path, the bunting, or the bluebirds on the fence. It was difficult giving this one away.

Saturday, February 18, 2012

Comments (Updated)

For some reason I can't reply to the kind comments many of you have left on my blog.

I apologize in the delay in replying, as noted in an earlier post, the blog has been neglected for a bit.

For those asking about where I purchased the Eric Carle fabric... I made that dress a little over 2 years ago and I bought the fabric at Fourth Corner Quilts in Bellingham, WA.

For those requesting dresses... I would be happy to help, and I sent you an email. I am flattered!

Thank you everyone who has left such kind words. Hopefully soon, I will be able to reply my thanks individually.

UPDATE: I can reply to comments now!

Writing desk

I picked up this writing desk from freecycle. It is the perfect size for our guest bedroom.

This is the picture from the posting, so it fails to show that the front leg on the other side had been ripped off and it was just balancing there. I ended up screwing the leg back onto the desk in the only solid piece I could. I then "rebuilt" the side and the leg with sawdust and wood glue. It worked very well.


I painted it an antique white and distressed all the edges. I still need to replace the knobs (I am thinking glass ones) but for now, it's all good.


I lined the back of the cubbies with scrapbook paper and will do the same for the drawer.

Easy slip on tap shoes

I used to teach dance an eternity ago. Now that Ella has started her first dance classes, things feel like they have come full circle. Here is one trick for replacing those annoying ties that come with the standard maryjane style tap shoes.


With her shoes like this, Ella can slip them on and off all by herself, and they are just snug enough to stay on her feet during her enthusiastic shuffling.


The secret: The ball type pony tail holder. (I bought mine in a variety pack at Target)

Slide the elastic by one ball into the shoelace hole of the tap shoe

Bring the elastic up and over the ball


Take the elastic on the other side and slip it through the shoelace hole

Bring the elastic up over the ball

Done!
Happy Dancing!*

*Not pictured, but I also took a zebra sticker, cut it in half, and placed each half in each shoe. Then Ella can make sure her shoes are on the correct feet by matching up the zebra. Now, everyone runs out of dance to have their parent help them change into their tap shoes from their ballet shoes and I keep on playing angry birds while Ella is able to do it all by herself. :)

Advent Calendar

Inspired by Homemade by Jill's advent calendar, I decided that I needed to make one for our family. I also kinda decided this the day before we left to visit family for Thanksgiving (I needed a project for the road, etc), which meant that the calendar didn't actually get done until 8 days after the beginning of the month, but no worries, we got all caught up.


The tree waiting it's decorations


All the ornaments on the tree


Close up of the ornaments


* You can find Jill's calendar here

Apple Theme Birthday

For Thea's 1st birthday we did a green apple theme. No other reason then I have a slight obsession with apples and I thought it would be cute. :)


Modeling her smock dress. It's hard to tell much from any of the pictures, but the dress is a green gingham with 2 apple appliques and is trimmed in white lace.


The treats. We have caramel apples, spice cake cupcakes with whipped cream cheese frosting, apple shaped sugar cookies and apple pie pops.


Thea loved her cake so much, she decided to pick it up and take it with her.

Long time no see.

Sigh.

I try to console myself about my lack of posting with the thought that there are hundreds (thousands, probably) of dead blogs out there. All the good intentions and what not.

But, I still feel bad. But! I have been crafting. I will try to see if I can get caught up. :)